车牌识别
# 车牌识别
# 一、前置知识:
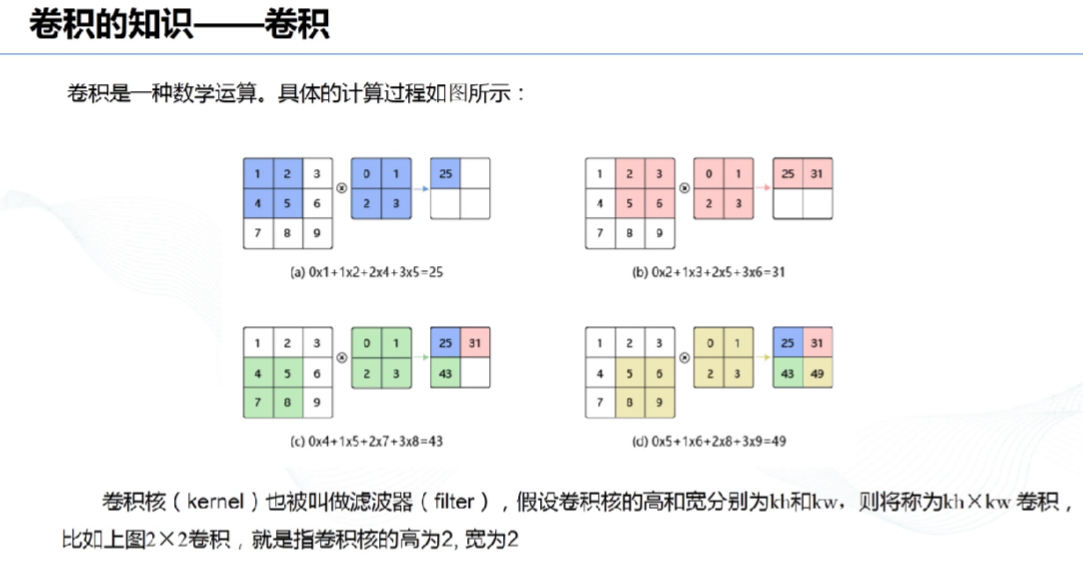
# 1、卷积:
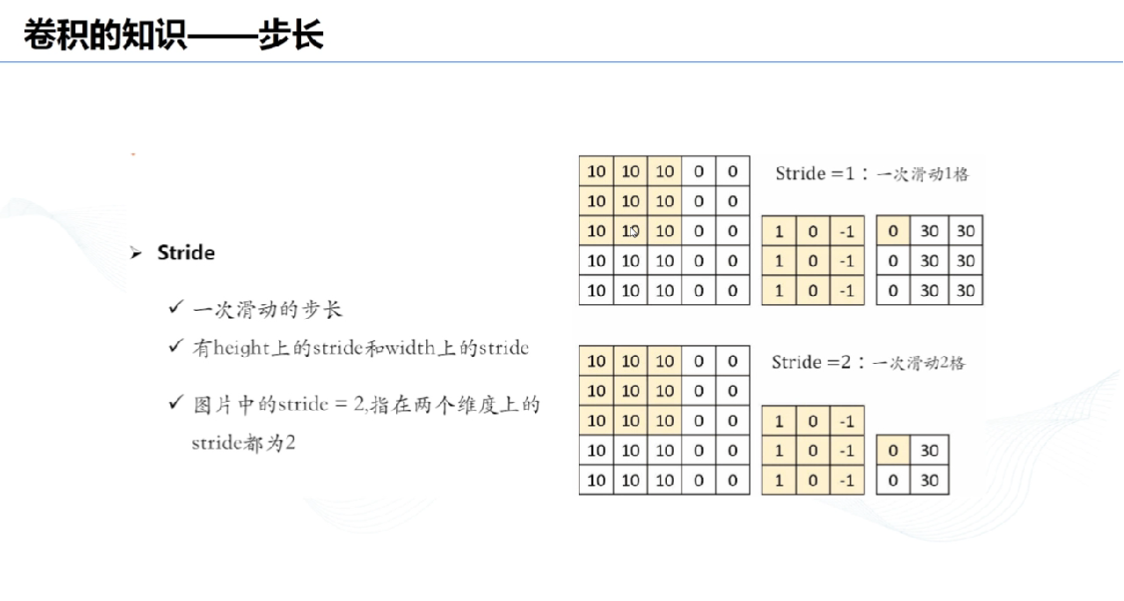
# 2、步长:
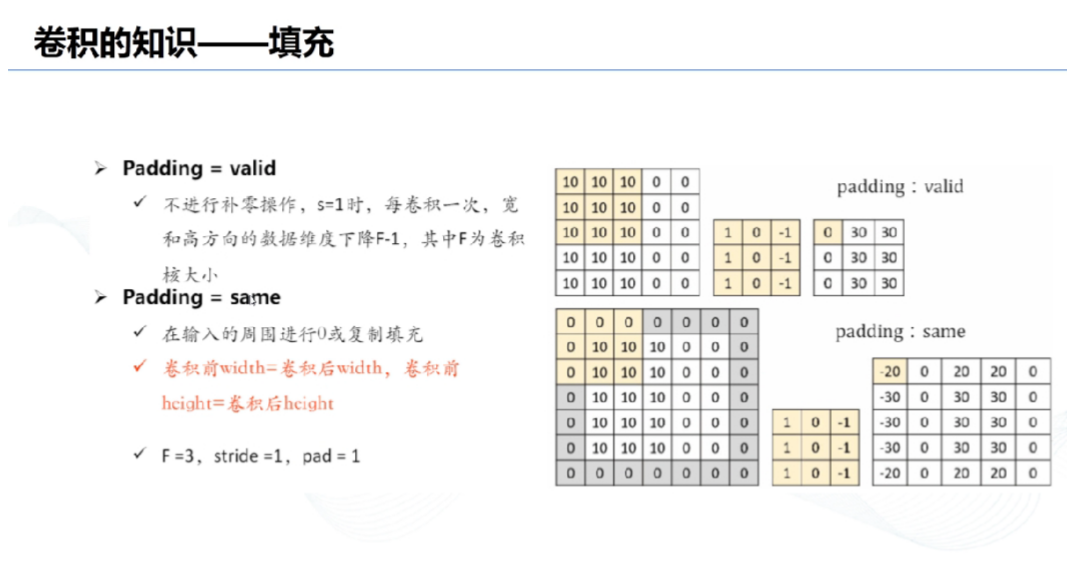
# 3、填充:
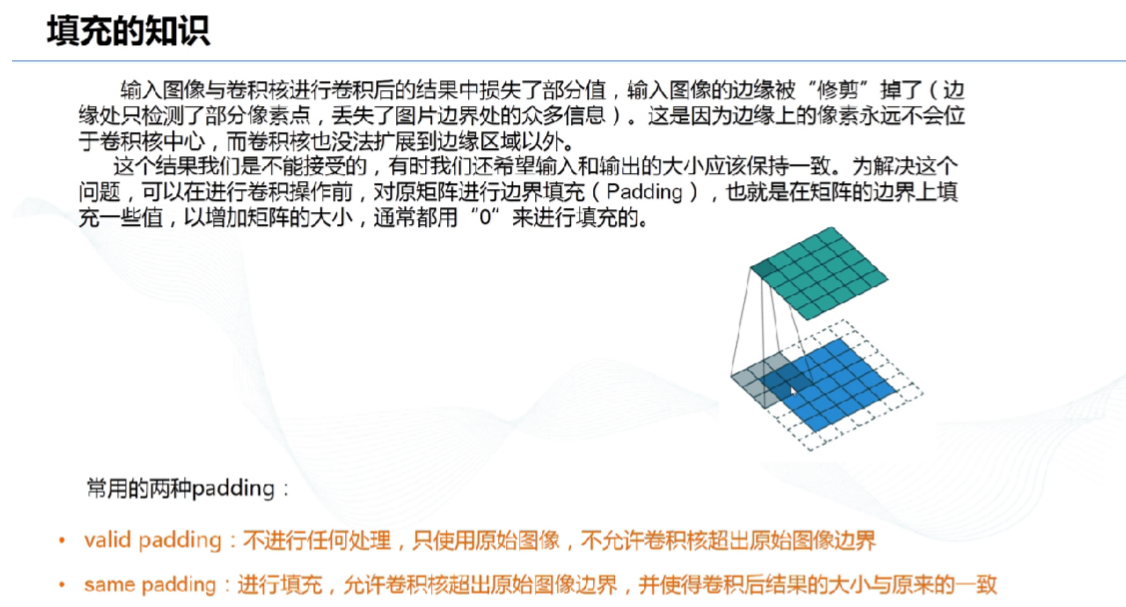
# 4、边界填充:
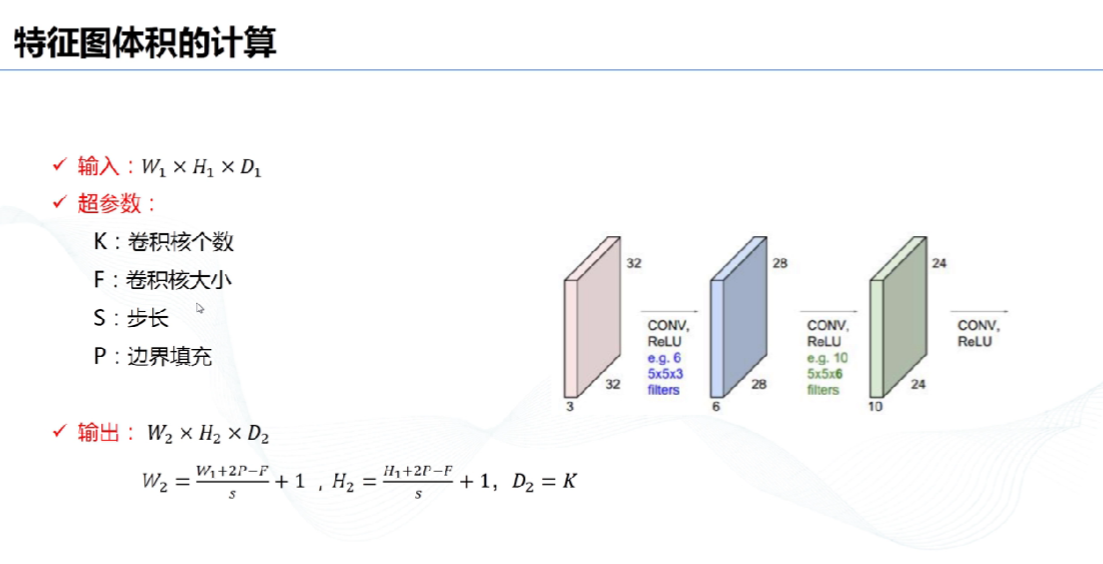
# 5、特征图体积计算:
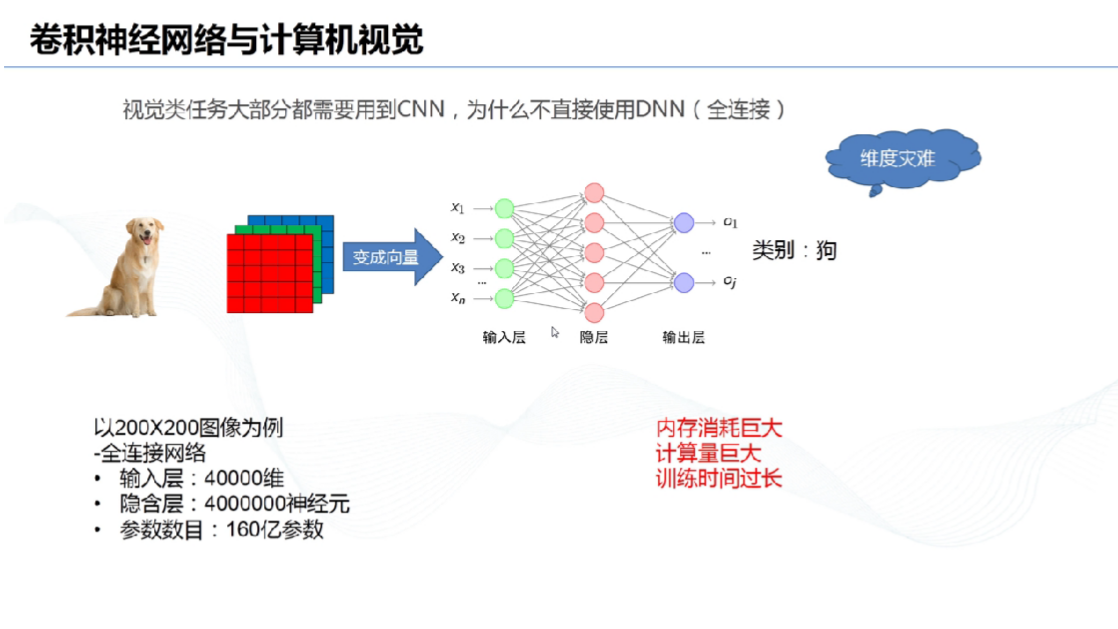
# 6、卷积神经网络与计算机视觉:
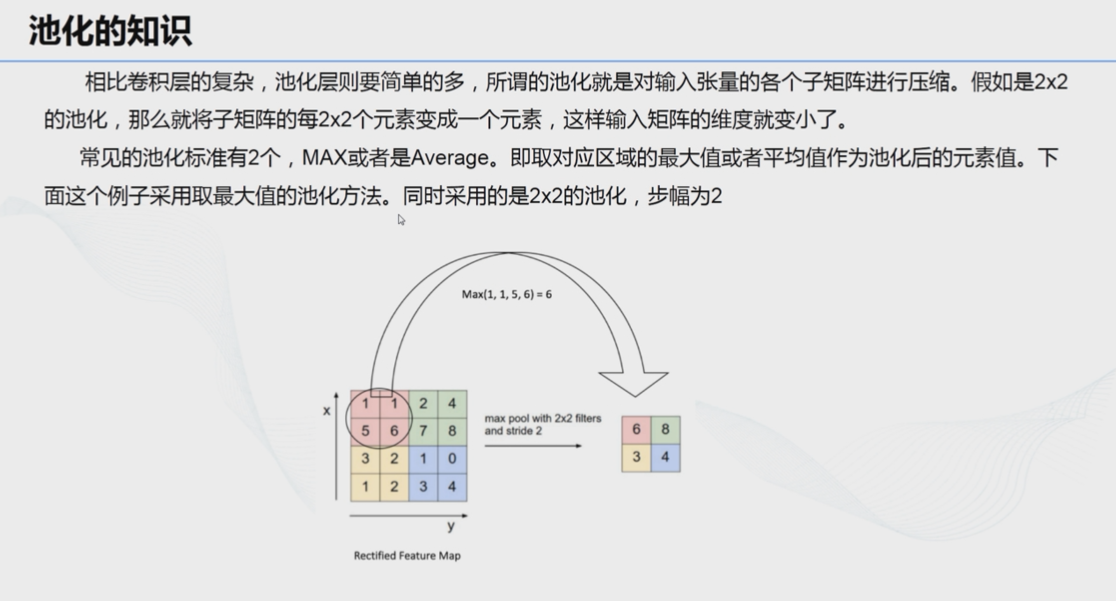
# 7、池化:
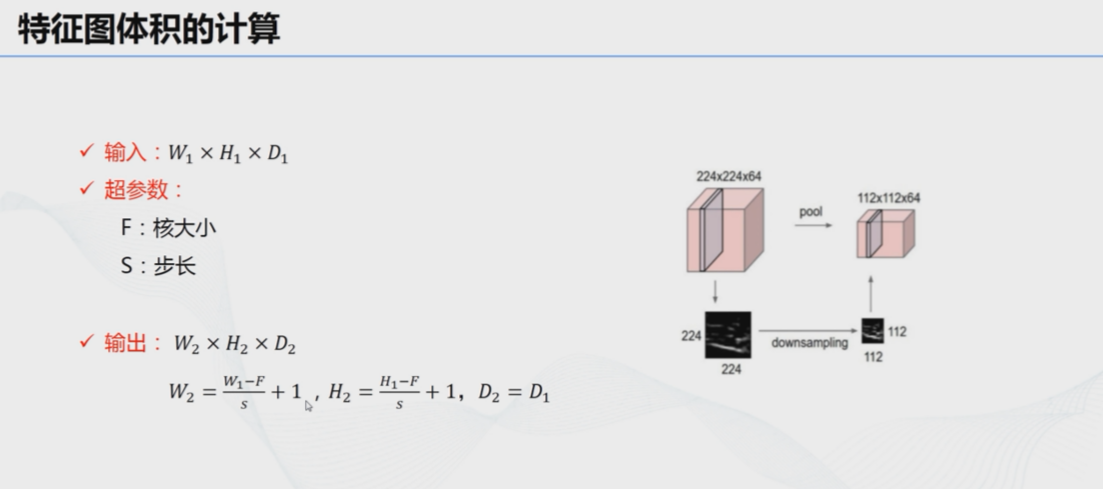
# 8、特征图体积的计算:
# 9、感受野:

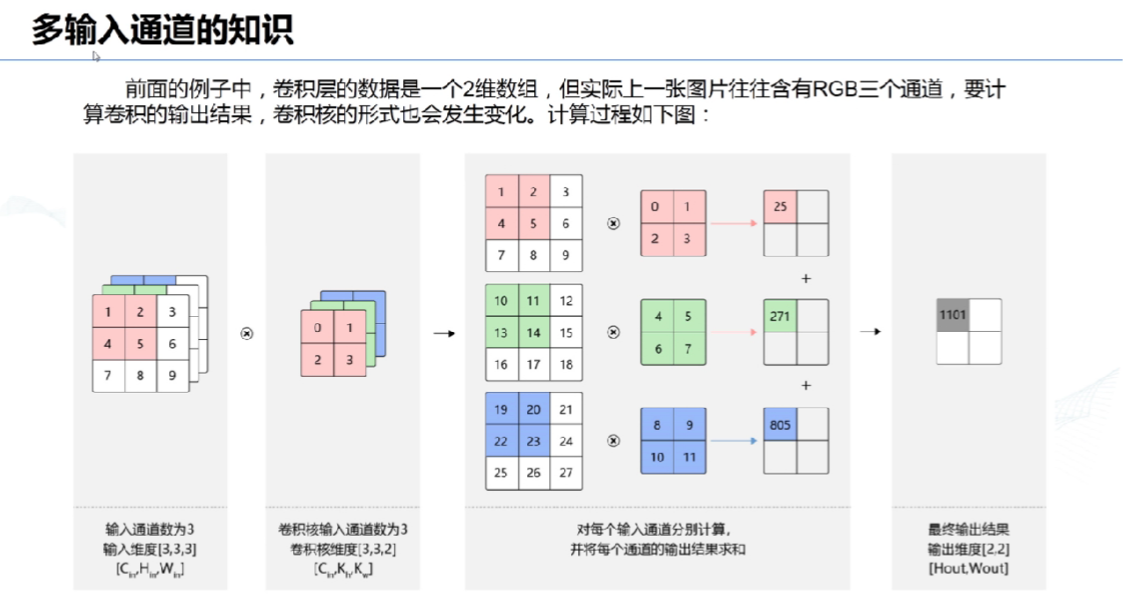
# 10、多输入通道:
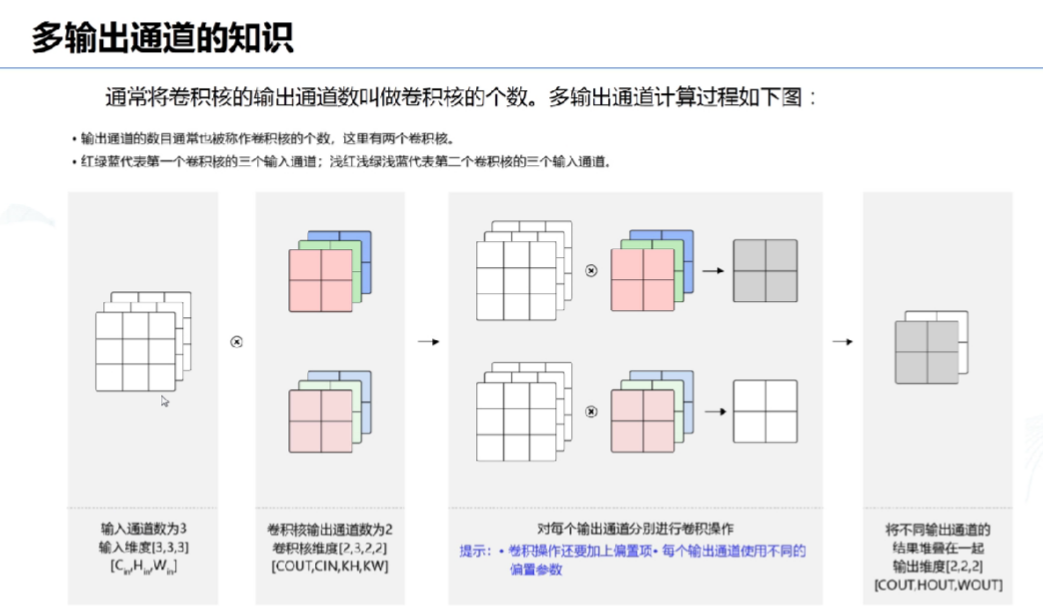
# 11、多输出通道:
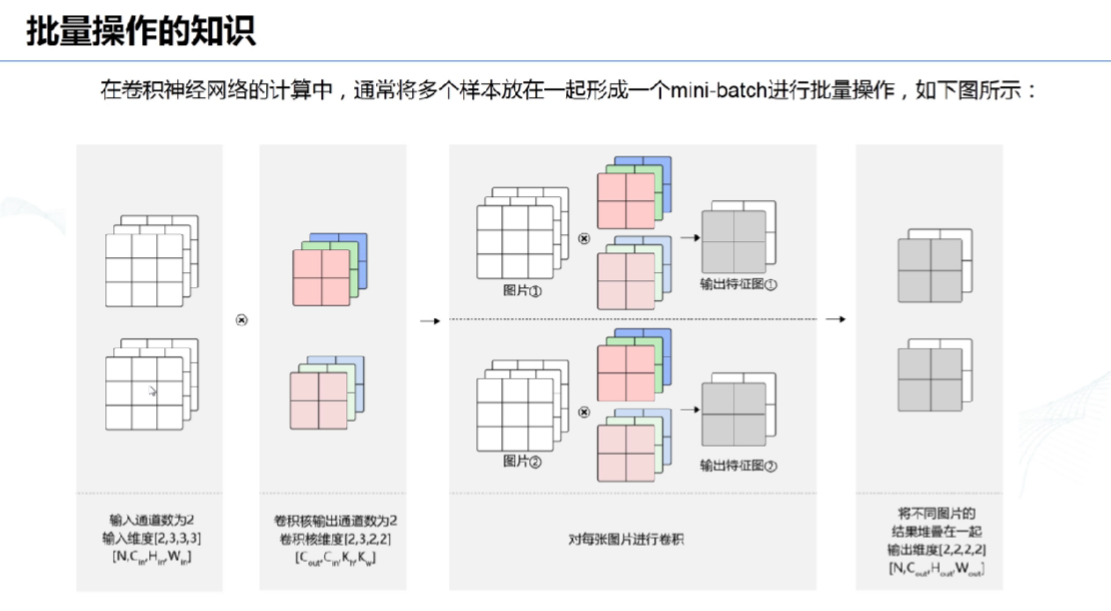
# 12、批量操作:
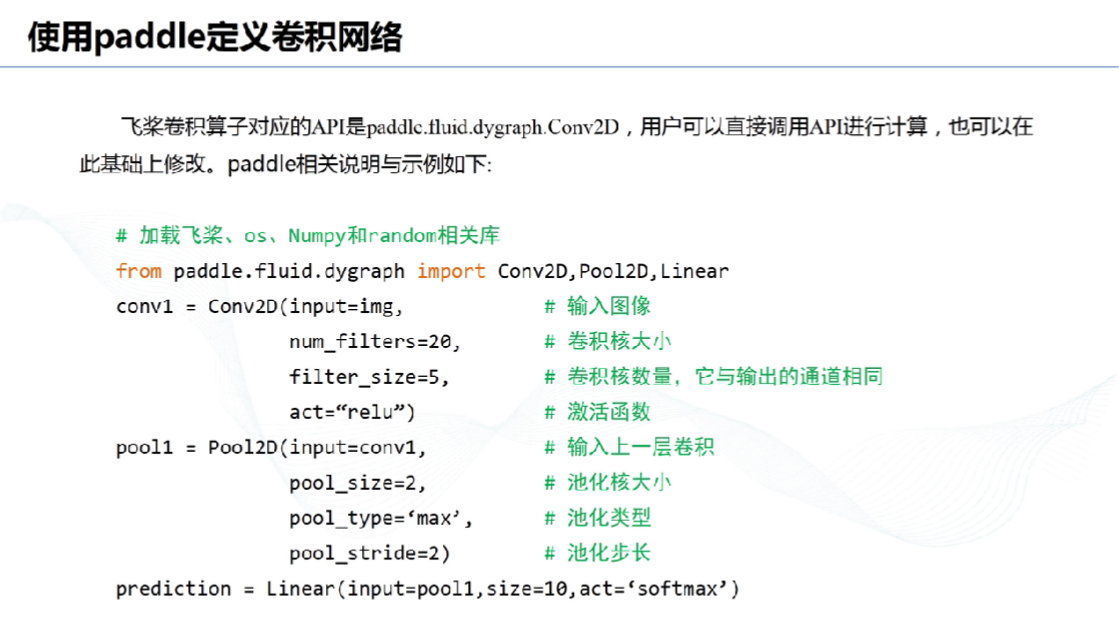
# 13、使用paddle定义卷积网络:
# 二、项目实施
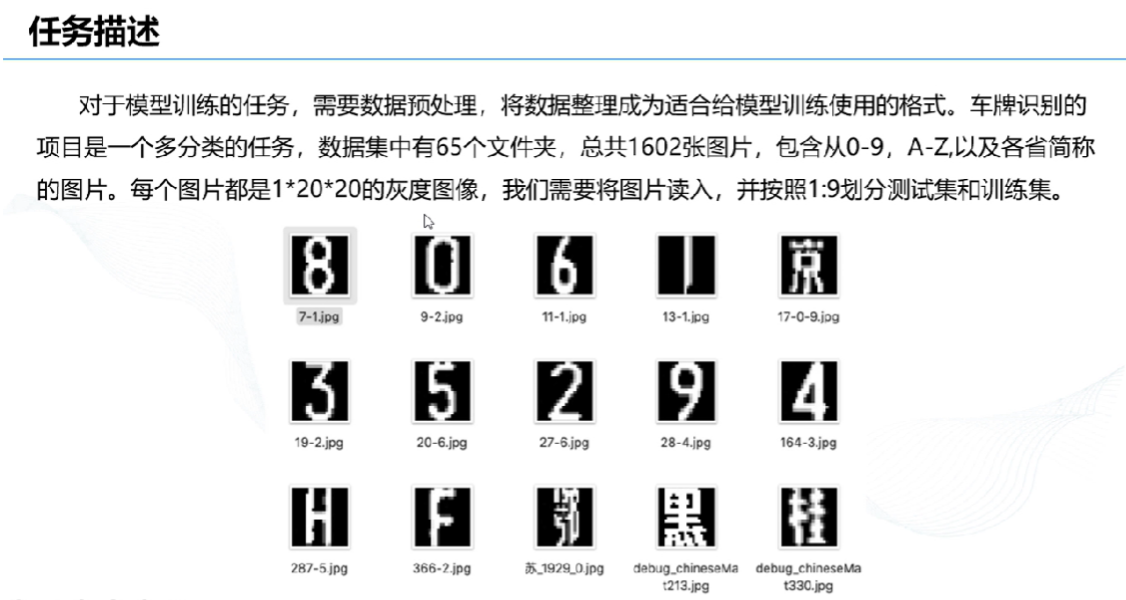
# 1、任务描述
# 2、步骤

# 3、环境准备
# 3.1、安装panddle
- panddle 1.8.5 (cpu版本)
pip install paddlepaddle==1.8.5 -i https://mirror.baidu.com/pypi/simple
1
- python 3.8
提示
照顾只有核显的同学们,选择的cpu版本
# 3.2、使用conda环境
conda env create -f paddle-env.yaml
# 即使用conda运行这个文件,创建一个名字为paddle-env.yaml的新环境
1
2
2
conda env list # 查看已有环境
1
conda activate paddle-env #切换为此环境
1
# 4、code(代码)
# 0)目录结构
├── .ipynb_checkpoints #jupyter notebook 配置文件 ├── data #数据集 ├── chepai.png #测试用的车牌号 ├── LicensePlate.ipynb 项目源代码 ├── paddle-env.yaml #conda环境打包文件 └── README.md
# 1)导入相关的包
import cv2 as cv
import os
import random
import numpy as np
import matplotlib.pyplot as plt
import paddle as paddle
import paddle.fluid as fluid
from multiprocessing import cpu_count
from paddle.fluid.dygraph import Pool2D,Conv2D
# from paddle.fluid.dygraph import FC 全连接后续改为Linear
from paddle.fluid.dygraph import Linear
1
2
3
4
5
6
7
8
9
10
11
2
3
4
5
6
7
8
9
10
11
# 2)数据导入,数据处理以及准备
data_path ='data'
character_folders = os.listdir(data_path)
label = 0
LABEL_temp = {}
#清除以前生成的列表文件
if(os.path.exists('./train_data.list')):
    os.remove('./train_data.list')
if(os.path.exists('./test_data.list')):
    os.remove('./test_data.list')
#遍历每一个子目录
for character_folder in character_folders:
    #创建新的train和test列表文件
    with open('./train_data.list','a') as f_train:
        with open('./test_data.list','a') as f_test:

            #过滤掉隐性文件
            if character_folder.startswith('.'):
                continue
            print(character_folder+" " + str(label))
            #存储一下标签的对应关系
            LABEL_temp[str(label)] = character_folder

            character_imgs = os.listdir(os.path.join(data_path,character_folder))
            #遍历每个文件
            for i in range(len(character_imgs)):
                #每十个图像文件中,取一个作为测试数据,其他作为训练数据
                if i%10 ==0:
                    f_test.write(os.path.join(os.path.join(data_path,character_folder),character_imgs[i])+ '\t'+str(label)+'\n')
                else:
                    f_train.write(os.path.join(os.path.join(data_path,character_folder),character_imgs[i])+'\t'+str(label)+'\n')

    #label加1
    label=label+1
print("图像列表已生成")

def data_mapper(sample):
    img,label = sample
    # 使用paddle.dataset自带函数读取img
    img = paddle.dataset.image.load_image(file=img,is_color=False)
    # 完成归一化和浮点类型转换
    img_arr = np.array(img,'f')
    img = img_arr.flatten().astype('float32') / 255.0
    return img, label
def data_reader(data_list_path):
    # 定义读取函数,从列表文件中读取
    def reader():
        with open(data_list_path,"r",encoding='utf-8') as f:
            lines = f.readlines()
            for line in lines:
                img,label = line.split("\t")
                yield img, int(label)
    # 使用多线程方式,通过用户自定义的映射器mapper来映射reader返回的样本(到输出队列)
    return paddle.reader.xmap_readers(data_mapper,reader,cpu_count(),1024)
# 用于训练的数据提供器
train_reader=paddle.batch(reader=paddle.reader.shuffle(reader=data_reader("./train_data.list"),buf_size=1400),batch_size=32)
# 用于测试的数据提供器
test_reader = paddle.batch(reader=data_reader("./test_data.list"),batch_size=32)
1
2
3
4
5
6
7
8
9
10
11
12
13
14
15
16
17
18
19
20
21
22
23
24
25
26
27
28
29
30
31
32
33
34
35
36
37
38
39
40
41
42
43
44
45
46
47
48
49
50
51
52
53
54
55
56
57
2
3
4
5
6
7
8
9
10
11
12
13
14
15
16
17
18
19
20
21
22
23
24
25
26
27
28
29
30
31
32
33
34
35
36
37
38
39
40
41
42
43
44
45
46
47
48
49
50
51
52
53
54
55
56
57
# 3)模型配置和训练
#定义网络
class MyLeNet(fluid.dygraph.Layer):
    def __init__(self):
        super(MyLeNet,self).__init__()
        # 第一层卷积层,输入单通道,50个卷积核,5*5卷积大小,步长为1
        self.hidden1_1 = Conv2D(1,50,5,1,act='relu')
        # 第一层池化,池化核大小2*2,最大池化,步长为1
        self.hidden1_2 = Pool2D(pool_size=2,pool_type='max',pool_stride=1)
        # 第二层卷积层,输入50通道,32个卷积核,3*3卷积大小,步长为1
        self.hidden2_1 = Conv2D(50,32,3,1,act='relu')
        # 第二层池化,池化核大小2*2,最大池化,步长为1
        self.hidden2_2 = Pool2D(pool_size=2,pool_type='max',pool_stride=1)
        # 第三层卷积层,输入32通道,120个卷积核,3*3卷积大小,步长为1
        self.hidden3 = Conv2D(32,120,3,1)
        # 第四层全连接,输出到分类,softmax激活函数
        self.hidden4 = Linear(120*10*10,65,act='softmax')
    def forward(self,input):
        x = self.hidden1_1(input)
        x = self.hidden1_2(x)
        x = self.hidden2_1(x)
        x = self.hidden2_2(x)
        x = self.hidden3(x)
        # 将输出扁平化
        x = fluid.layers.reshape(x,shape=[-1,120*10*10])
        y = self.hidden4(x)
        return y
with fluid.dygraph.guard():
    # 模型实例化
    model = MyLeNet()
    # 进入/开启训练模式
    model.train()
    # 设置优化器,选用SGD随机制度下降,学习率为0.001
    opt = fluid.optimizer.SGDOptimizer(learning_rate=0.001,parameter_list=model.parameters())
    # 迭代次数
    epochs_num = 50
    train_loss = []
    train_acc = []

    for pass_num in range(epochs_num):
        # 遍历训练数据
        for batch_id,data in enumerate(train_reader()):   # 将数据转换成fluid要求的格式
            images = np.array([x[0].reshape(1,20,20) for x in data],np.float32)
            labels = np.array([x[1] for x in data]).astype("int64")
            labels = labels[:,np.newaxis]
            image = fluid.dygraph.to_variable(images)
            label =  fluid.dygraph.to_variable(labels)

            # 预测
            predict = model(image)
            # 计算损失
            loss = fluid.layers.cross_entropy(predict,label)
            # 获取loss值
            avg_loss = fluid.layers.mean(loss)
            # 计算精度
            acc = fluid.layers.accuracy(predict,label)
            # 每50个batch训练完后,显示一次损失值和精度值
            if batch_id != 0 and batch_id%50 == 0:
                print("train_pass;{},batch_id:{},train_loss:{},train_acc:{}".format(pass_num,batch_id,train_loss,train_acc))
            # 反向传播,计算评价损失
            avg_loss.backward()
            # 最小化损失
            opt.minimize(avg_loss)
            # 清除梯度值
            model.clear_gradients()
        # 保存评价过程中的损失值和精度值
        train_loss.append(avg_loss.numpy()[0])
        train_acc.append(acc.numpy()[0])
    # 保存fluid的动态图模型到MyLeNet
    fluid.save_dygraph(model.state_dict(),'MyLeNet')
plt.figure(figsize = (8,4))
plt.subplot(121)
plt.plot(train_loss)
plt.subplot(122)
plt.plot(train_acc)
plt.show()
1
2
3
4
5
6
7
8
9
10
11
12
13
14
15
16
17
18
19
20
21
22
23
24
25
26
27
28
29
30
31
32
33
34
35
36
37
38
39
40
41
42
43
44
45
46
47
48
49
50
51
52
53
54
55
56
57
58
59
60
61
62
63
64
65
66
67
68
69
70
71
72
73
74
75
2
3
4
5
6
7
8
9
10
11
12
13
14
15
16
17
18
19
20
21
22
23
24
25
26
27
28
29
30
31
32
33
34
35
36
37
38
39
40
41
42
43
44
45
46
47
48
49
50
51
52
53
54
55
56
57
58
59
60
61
62
63
64
65
66
67
68
69
70
71
72
73
74
75
# 4)模型评估/校验
# 模型校验
with fluid.dygraph.guard():
    accs = []
    # 加载MyLeNet模型
    model_dict,_ = fluid.load_dygraph('MyLeNet')
    model = MyLeNet()
    # 加载模型参数
    model.load_dict(model_dict)
    # 进入模型检验模式
    model.eval()
    # 遍历测试集
    for batch_id,data in enumerate(test_reader()):
        # 整理数据格式
        images = np.array([x[0].reshape(1,20,20) for x in data],np.float32)
        print(images)
        labels = np.array([x[1] for x in data]).astype('int64')
        labels = labels[:,np.newaxis]
        image = fluid.dygraph.to_variable(images)
        label = fluid.dygraph.to_variable(labels)
        # 进行预测
        predict = model(image)
        # 计算精度
        acc = fluid.layers.accuracy(predict,label)
        # 记录精度
        accs.append(acc.numpy()[0])
        # 获取平均精度
        svg_acc = np.mean(accs)
    print(svg_acc)
# 将图像二值化
license_plate = cv.imread("./chepai.png")
gray_plate = cv.cvtColor(license_plate,cv.COLOR_RGB2GRAY)
ret,binary_plate = cv.threshold(gray_plate,175,255,cv.THRESH_BINARY)
print(binary_plate)
plt.imshow(binary_plate,cmap='gray')
plt.show()

# 对车牌图片进行处理,分割出车牌中的每一个字符并保存
result = []
# 遍历黑白图像的每一列
for col in range(binary_plate.shape[1]):
    result.append(0)
    # 累加这一刻上的所有像素值之和
    for row in range(binary_plate.shape[0]):
        result[col] = result[col] + binary_plate[row][col] / 255

# 初始化字符
character_dict = {}
num = 0
i = 0
# 遍历累加像素值,如果找到非0值,作为字符串的坐标轴的起始列,在下一个0值前作为结束列
while i < len(result):
    if result[i] == 0:
        i += 1
    else:
        index = i+1
        while result[index] != 0:
            index += 1
        character_dict[num] = [i,index-1]
        num += 1
        i = index

# 除了第三个“点”字符,切割其他的字符并保存为单独的文件,并缩放图像尺寸到20*20
for i in range(8):
    if i == 2:
        continue
    padding = (170 - (character_dict[i][1] - character_dict[i][0])) / 2
    ndarray = np.pad(binary_plate[:,character_dict[i][0]:character_dict[i][1]], ((0,0), (int(padding), int(padding))), 'constant', constant_values=(0,0))
    ndarray = cv.resize(ndarray,(20,20))
    cv.imwrite("./" + str(i) +".png",ndarray)

def load_image(path):
    img = paddle.dataset.image.load_image(file=path,is_color=False)
    img = img.astype("float32")
    img = img[np.newaxis,] /255.0
    return img
#将标签进行转换
print('Label:',LABEL_temp)
match = {'A':'A','B':'B','C':'C','D':'D','E':'E','F':'F','G':'G','H':'H','I':'I','J':'J','K':'K','L':'L','M':'M','N':'N',
        'O':'O','P':'P','Q':'Q','R':'R','S':'S','T':'T','U':'U','V':'V','W':'W','X':'X','Y':'Y','Z':'Z',
        'yun':'云','cuan':'川','hei':'黑','zhe':'浙','ning':'宁','jin':'津','gan':'赣','hu':'沪','liao':'辽','jl':'吉','qing':'青','zang':'藏',
        'e1':'鄂','meng':'蒙','gan1':'甘','qiong':'琼','shan':'陕','min':'闽','su':'苏','xin':'新','wan':'皖','jing':'京','xiang':'湘','gui':'贵',
        'yu1':'渝','yu':'豫','ji':'冀','yue':'粤','gui1':'桂','sx':'晋','lu':'鲁',
        '0':'0','1':'1','2':'2','3':'3','4':'4','5':'5','6':'6','7':'7','8':'8','9':'9'}
L = 0
LABEL ={}
for V in LABEL_temp.values():
    LABEL[str(L)] = match[V]
    L += 1
print(LABEL)

#构建预测动态图过程
with fluid.dygraph.guard():
    model=MyLeNet()#模型实例化
    model_dict,_=fluid.load_dygraph('MyLeNet')
    model.load_dict(model_dict)#加载模型参数
    model.eval()#评估模式
    lab=[]
    for i in range(8):
        if i==2:
            continue
        infer_imgs = []
        infer_imgs.append(load_image('./' + str(i) + '.png'))
        infer_imgs = np.array(infer_imgs)
        infer_imgs = fluid.dygraph.to_variable(infer_imgs)
        result=model(infer_imgs)
        lab.append(np.argmax(result.numpy()))
print(lab)

img = cv.imread("./chepai.png")
img = cv.cvtColor(img,cv.COLOR_BGR2RGB)
plt.imshow(img)
print("\n车牌识别结果为:",end="")
for i in range(len(lab)):
    print(LABEL[str(lab[i])],end='')
1
2
3
4
5
6
7
8
9
10
11
12
13
14
15
16
17
18
19
20
21
22
23
24
25
26
27
28
29
30
31
32
33
34
35
36
37
38
39
40
41
42
43
44
45
46
47
48
49
50
51
52
53
54
55
56
57
58
59
60
61
62
63
64
65
66
67
68
69
70
71
72
73
74
75
76
77
78
79
80
81
82
83
84
85
86
87
88
89
90
91
92
93
94
95
96
97
98
99
100
101
102
103
104
105
106
107
108
109
110
111
112
113
114
# 三、源代码/整个项目
务必给个⭐️
谢谢!🙏
上次更新: 2023/09/05 17:45:42
